A Canva Brand Kit is a central library for your logos, colours, fonts and brand templates inside Canva. It works by storing those assets against your account so anyone designing in Canva can apply them in a click. Set it up once, and every social tile, presentation and marketing email your team produces stays on-brand without anyone hunting through Dropbox for the right logo file.
For marketing teams running content across half a dozen channels, this is the difference between consistent output and a slow drift away from your visual identity. Set it up once, keep it tidy, and the payoff lasts.
This guide walks through every step, with the practical tips that aren’t in Canva’s own help docs.

What a Brand Kit Actually Does for Your Team
Your Brand Kit acts as a guardrail. Once it’s set up, anyone designing in Canva sees your brand assets in the editor panel and applies them with a click. No more “which version of the logo is the right one?” Slack messages. No more accidental off-brand pink.
Five things it changes in practice.
- Consistency across every output. Social posts, decks, one-pagers and ads all pull from the same colour and font definitions.
- Faster turnarounds. Designers and non-designers stop guessing at hex codes and start picking from a palette.
- Stronger recognition. When your visual identity holds up across every touchpoint, your brand becomes easier for customers to remember.
- Cleaner collaboration. Junior team members, freelancers and contractors can produce on-brand work without a brand briefing every time.
- A single source of truth. When the logo updates, you update it in one place.
The Brand Kit isn’t a substitute for proper brand guidelines. It’s the operational layer that puts those guidelines into the tools your team actually uses.
Which Canva Plans Include Brand Kit?
Brand Kit is available on Canva Pro and higher tiers, plus Canva for Education and Canva for Nonprofits. The free plan includes a stripped-back version (one kit, three colours), which won’t cut it for most marketing teams. Pro gives you up to 5 Brand Kits. Business expands that further, useful if you manage sub-brands or run brand kits for separate clients.
Permission to create and edit Brand Kits sits with admins and users assigned the Brand Designer role. If you’re trying to set one up and the option isn’t showing, your plan or role is the likely reason.
Step 1: Create Your Brand Kit
Log in to Canva and open the homepage. In the left panel, click Brand, then Brand Kit, then Add Brand Kit. Give it a name (the brand name is usually enough), then click Create.
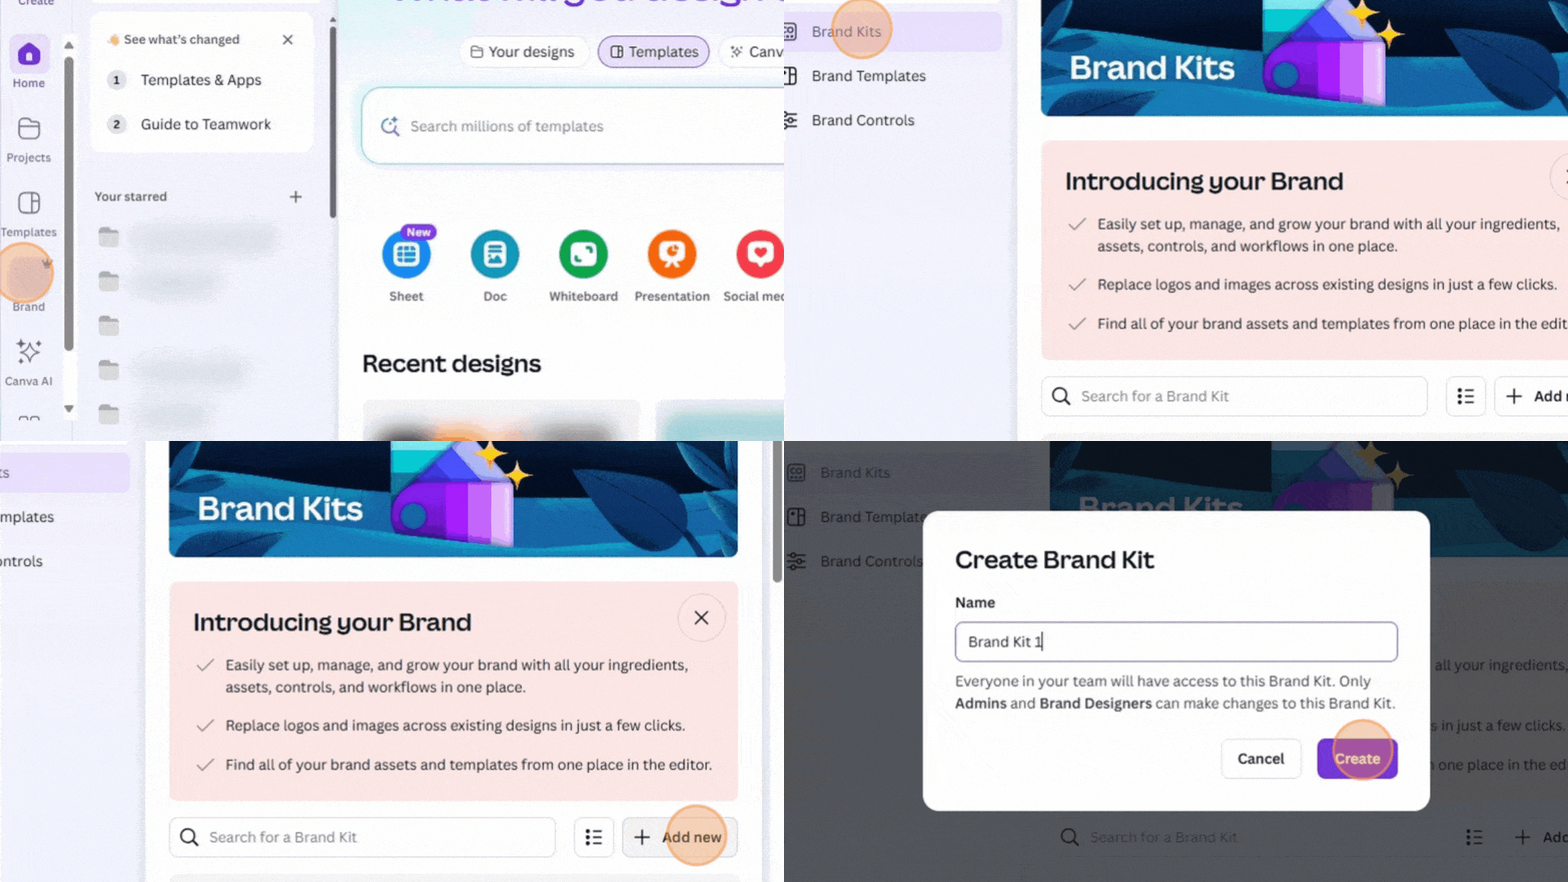
If you have existing brand guidelines as a PDF, Canva can read them and pre-fill your Brand Kit using AI. Upload the document when prompted and it will pull out logos, colours and fonts automatically. It’s not perfect, so check everything before you trust it, but it’s a fast head start if your guidelines are clear.
Step 2: Upload Your Logos
In the Logos section, click Add new, then Upload logos. Drag and drop also works. Canva accepts SVG, PNG and JPG files.
A few things matter here.
File format. SVG is the best option for logos because it scales without losing quality, business card to billboard. PNG with a transparent background is the next best, useful when you need to drop a logo over an image. JPG is the weakest choice because the background isn’t transparent.
Upload every version. Banner ads, brochures and social posts come in different ratios, so having one logo isn’t enough. Upload the variations you actually use.
- Wide and stacked layouts
- With and without tagline
- Symbol on its own and logotype on its own
- Positive, reversed, mono and mono reversed
- Sub-brand marks
- Lock-ups with partner or accreditation logos
Add usage guidance. Click Add new, then Add guidelines, and write a short note covering when to use each version, minimum sizes, and what not to do (no stretching, no recolouring, clear space rules). This is the part most teams skip. It’s also the part that prevents the most off-brand work.
To use a logo later, open any design, click Brand in the side panel, and click the logo you want.
Step 3: Define Your Brand Colours
In the Brand colors area, click the + icon and enter the hex code for each colour in your palette.
If you don’t know your hex codes, check your brand guidelines. If you don’t have guidelines, use Photoshop or Figma’s eyedropper to pick the colour from an existing asset. Free browser tools like ColorZilla do the same job in a pinch.
Three tips that make this section more useful.
Add your full palette, not just the primaries. Include secondary colours, accent colours, neutrals and greys. The whole point is removing guesswork.
Name the colours. “Mettro Navy” is easier to reference in a brief than “the dark blue one”. Rename palettes and individual colours so they make sense to people who didn’t set them up.
Use multiple palettes for sub-brands. If you run distinct visual identities for different products or services, click Add new then Add palette to create a second set. You can delete colours by hovering and clicking the X, and delete entire palettes from the More menu next to the palette name.
To apply a colour in a design, select the element, click the colour tile in the toolbar, and pick from your palette.
Step 4: Set Your Brand Fonts
Go to the Brand fonts section. You can either pick fonts from Canva’s library or upload your own. Canva supports OTF, TTF and WOFF for uploads. If you’re uploading licensed fonts, make sure your licence covers commercial use in Canva. This is where teams sometimes get caught.
Set defaults for each text style. Heading, subheading, body, and so on. Click the heading type, choose your font from the dropdown, then adjust size and weight. Your uploaded fonts appear in the same list.
You can only set one default font per text style per Brand Kit. If your brand uses different fonts for editorial vs marketing collateral, you’ll need separate Brand Kits or you’ll need to switch fonts manually in those designs.
Add font usage guidelines the same way you did for logos. Cover things like when to use each font, weight pairings, and any rules around tracking or all-caps usage.
Step 5: Upload Recurring Graphics, Icons and Photography
Scroll to the relevant sections in the Brand Kit and drag and drop the assets you reach for repeatedly. Photography, icon sets, illustrations, charts, patterns, anything that shows up in more than three designs a month is worth uploading.
This is the section most teams under-use. A well-stocked Brand Kit means a designer or marketing manager can build a full piece of collateral without leaving the Canva editor. An empty one means everyone’s still digging through shared drives.
Once they’re in the kit, you access them the same way as everything else. Open a design, click Brand in the side panel, and click the asset to insert.
Optional: Set Up Brand Voice
If you use Canva’s AI writing tool, you can set a Brand Voice that shapes the tone of any text Magic Write generates. Click Add brand voice and paste in your tone of voice guidelines, plus a few sample sentences that sound like your brand.
Brand Voice is available on Canva Pro, Business, Education and Nonprofits. Only owners, admins and brand designers can edit it.
To use it, open a design, scroll to Brand Voice in the side panel, and select Generate text in this brand voice. Type the prompt (for example, “Write a LinkedIn post announcing our new service”), then click Generate. The output will lean toward your brand’s tone instead of a generic AI voice.
A caveat. AI-generated copy still needs a human edit. Brand Voice gets you closer to in-brand, but it won’t catch the things only a person who knows the business can catch.
Why Marketing Managers Should Care About Getting This Right
A Brand Kit isn’t solely a designer’s tool. It’s an operations tool for marketing teams.
If your team produces content across social, email, ads and sales collateral, the cost of brand inconsistency adds up quickly. Every off-brand asset is one more reason a customer struggles to recognise you. A reverted logo means a small productivity loss across the team. The “which colour is right?” question is context-switching nobody needs.
Setting up the Brand Kit properly is one of the most useful things a marketing manager can do in Canva. Every logo variation, the full colour palette, named conventions and clear usage notes. The team gets faster. The output gets cleaner. The brand stops drifting.
If you’re rebuilding your visual identity at the same time, the Brand Kit is the right place to deploy the new system. Set it up, lock down the old assets, and the next batch of collateral will be on the new brand by default.
Your Move
A Brand Kit is only as good as the work that goes into it. Spend the time setting it up properly, add the usage notes, name everything sensibly, and your team will get the payoff every day after.
For more on building a brand that holds up across every digital touchpoint, see our take on why design matters, our guide to content marketing, and why your website is no longer just a tool. It’s the hub of your business.