Your WordPress profile is the small block of information that sits behind every post you publish. Your name, bio, photo, and social links. To update your profile in WordPress, log in to your dashboard, go to Users > Your Profile in the left-hand menu, edit the fields you need, and click Update Profile at the bottom of the screen.
That’s the short version. The rest of this guide walks through each field, what it does, and the settings worth getting right.
Why Your WordPress Profile Matters
Your profile is what links an article to the person who wrote it. On most WordPress themes, the data in your profile feeds the author byline, the bio at the foot of a post, and any author archive page the site runs.
A complete profile does three things at once. It gives readers a face and a name to attach to the writing. It signals to search engines that the content has a real author behind it, which matters more every year for credibility. And it gives you a useful internal record of who has access to the site and at what level.
Before You Start
There are a few things worth knowing before you open the profile screen.
- You need to be logged in. Standard, but worth saying. Your username and password get you into the WordPress dashboard at yourdomain.com/wp-admin.
- You can only edit your own profile unless you’re an Administrator. Admins can edit anyone’s. Editors, Authors, Contributors and Subscribers can only edit their own.
- Some fields may be hidden or extended depending on the theme and plugins the site runs. Yoast SEO, for example, adds social profile fields. A custom theme might add a “job title” or “expertise” field. The core fields below are the ones every WordPress install has.
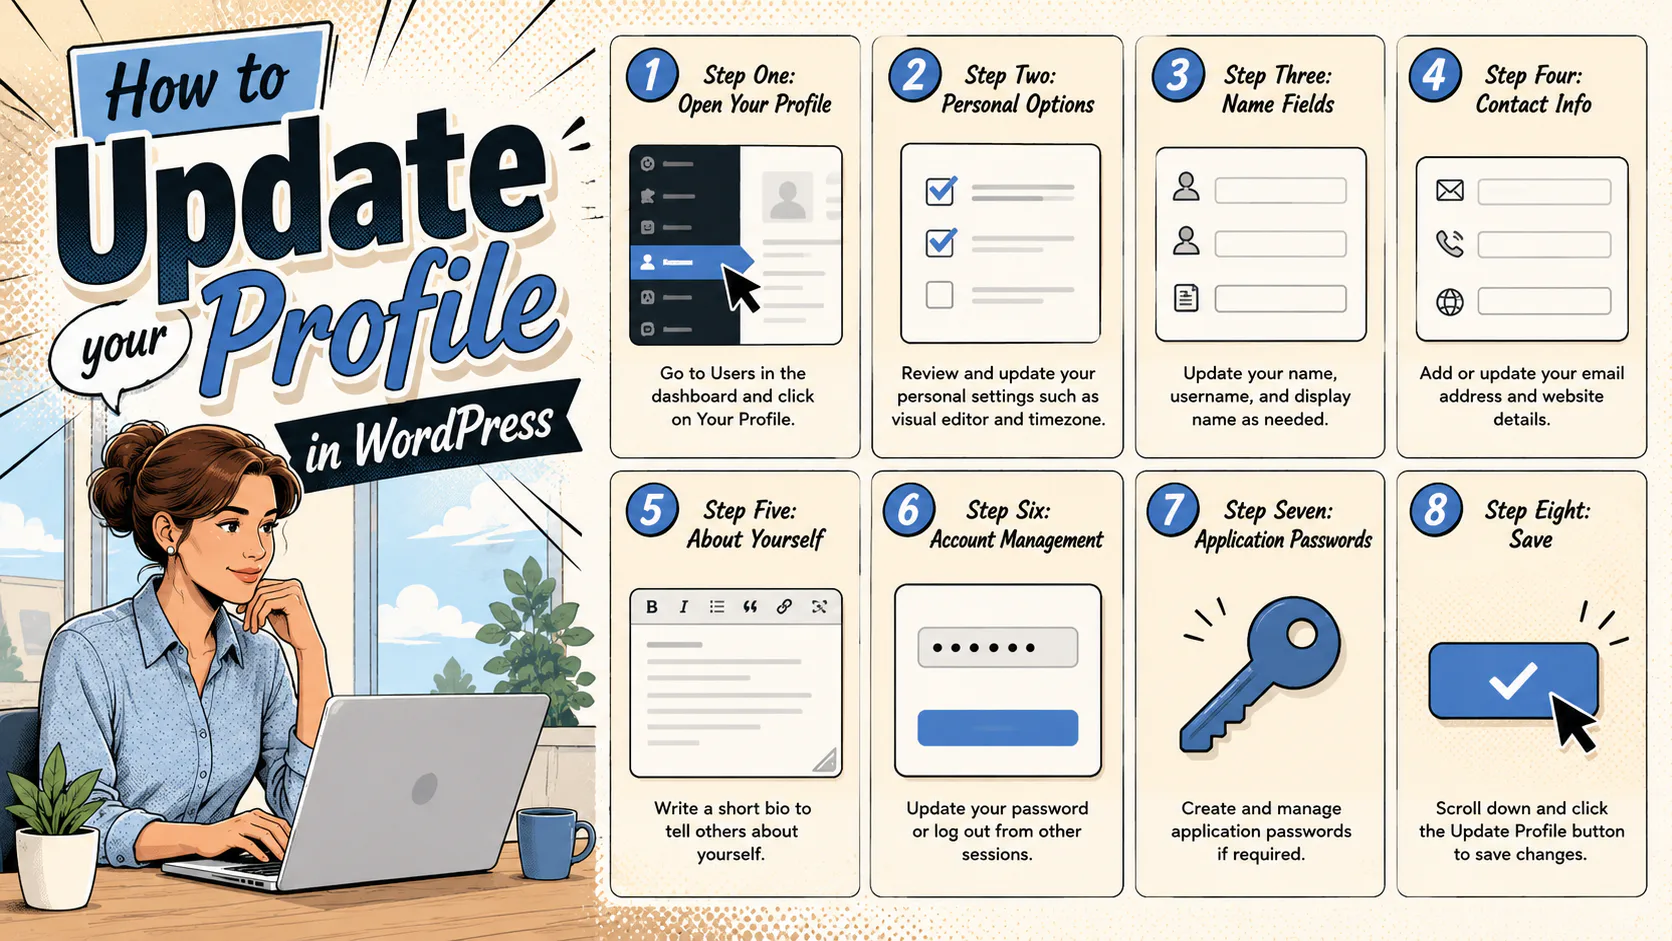
Step One: Open Your Profile
From the WordPress dashboard, look at the left-hand menu and find Users. Click it, and the sub-menu will expand.
You have two paths from here.
The first is to click Users, then Your Profile from the sub-menu. The second is to hover over Users in the menu. A flyout will appear with Your Profile as one of the options. Click it.
Both land you in the same place. The second is one click faster, which adds up if you update your profile often.
You can also reach your profile by clicking your name or avatar in the top right of the admin bar, then selecting Edit My Profile. Three paths, same destination.
Step Two: Personal Options
The first block of fields on the profile screen covers the look and feel of your WordPress admin experience. None of this is shown publicly, but it’s worth a quick pass.
Visual Editor. Leave this unchecked unless you have a specific reason to write in plain code. The visual editor is the standard writing experience in WordPress.
Syntax Highlighting. If you ever edit code inside WordPress, leave this on. It colours the code so it’s easier to read.
Admin Colour Scheme. Cosmetic only. Pick whatever you find easiest on the eyes.
Keyboard Shortcuts. Useful if you moderate comments in bulk. Otherwise, ignore.
Toolbar. Keep “Show Toolbar when viewing site” checked. It gives you quick access to the admin while you’re looking at the live site.
Language. Set this to your preferred admin language. It only affects what you see in the dashboard, not the language of your site.
[Image: Personal Options section of the profile screen]
Step Three: Name Fields
This is where your byline starts to take shape. WordPress holds several name fields for each user, and the one that actually shows up on the front end is set here.
Username. Set when the account was created. You can’t change it. If you need a different one, an Administrator has to create a new account and delete the old one.
First Name. Your given name.
Last Name. Your surname.
Nickname. A separate field, useful if you write under a name that isn’t your legal one. It defaults to your username, so update it if you don’t want your login showing up anywhere on the site.
Display Name Publicly As. This is the important one. The dropdown gives you a few combinations. First name, last name, full name, nickname, username. Whatever you pick here is what readers will see on the front end of the site.
A common mistake is leaving the Display Name set to the username. If your login is something like jsmith-admin, that’s what your byline says. Set this to your full name or nickname so the front end looks intentional.
Step Four: Contact Info
Email. This is your account email. Password resets, comment notifications and plugin alerts all go here. Make sure it’s an address you actually check.
Website. Your personal site or portfolio, if you have one. On many themes, the byline links your author name to whatever you put here.
Social profiles. Default WordPress doesn’t include social fields, but most modern themes and SEO plugins add them. Common ones are X, LinkedIn, Facebook, Instagram and YouTube. Add full URLs, not just usernames. https://linkedin.com/in/yourname rather than @yourname.
A few rules for the social fields. Only link profiles you actually maintain. A dead Twitter account from 2018 does more harm than leaving the field blank. Match the profiles to the audience. For a B2B site, LinkedIn matters more than Instagram. For a creative agency, the reverse may be true.
Step Five: About Yourself
This is the section that fills out the author bio block on the front end. Two fields matter here.
Biographical Info
The biographical info field is your author bio. On most themes, it appears at the foot of every post you write, sometimes also on the author archive page.
A good author bio is short, specific and useful. Two to four sentences. Who you are, what you do, and something that gives the reader a reason to keep reading you or follow you.
Avoid the generic. “Passionate about all things digital” tells readers nothing. “Writes about WordPress and content strategy for small businesses” tells them what to expect.
If you write in more than one voice or area, pick the one that fits the site. The bio on a finance blog is not the bio on a personal blog.
You can include basic HTML in this field. A link, italics, and line breaks. Keep formatting light. The bio is supposed to be readable at a glance.
Profile Picture
WordPress uses Gravatar for profile pictures by default. Gravatar is a free service that ties an avatar to your email address, so the same image appears on any WordPress site (or other Gravatar-enabled service) where you use that email.
To set or change your avatar, go to gravatar.com, sign in with the same email address you use on the WordPress site, and upload an image. It can take a few minutes to propagate.
If the site runs a custom avatar plugin, you may be able to upload directly inside WordPress. The field will appear in this section if so.
A few things to get right with the photo. Use a clear headshot or a recognisable image. Avoid group shots, because readers can’t tell which one is you. Square crop works best, since WordPress will crop to a circle or square depending on the theme. Keep the file size reasonable, under 200KB is fine.
Step Six: Account Management
Below the profile fields, you’ll find a section for password and session management.
New Password. Click Set New Password to generate one. WordPress suggests a strong password by default. You can edit it, but the suggested one is worth keeping. Long and random is better than memorable.
Use a password manager. If you don’t, you’ll either reuse passwords or forget the new one within a week.
Sessions. If you’ve logged in from a public computer, a phone you’ve since sold, or anywhere you’re not sure about, click Log Out Everywhere Else. It ends every session except the one you’re currently in. A small thing, but useful when you need it.
Step Seven: Application Passwords
Application passwords let external apps connect to your WordPress site without using your main login password. Mobile apps, automation tools, third-party publishing tools, that sort of thing.
You probably don’t need to touch this section unless you’re setting up a specific integration. If you do, the documentation for the app you’re connecting to will tell you what to do.
A note on security. Application passwords have the same level of access as your account. Only create them for apps you trust, and revoke any you no longer use.
Step Eight: Save
Scroll to the bottom and click Update Profile. WordPress will show a confirmation message at the top of the screen, usually a green bar that says “Profile updated.”
If you don’t see the confirmation, scroll back up. WordPress will often flag errors inline. A password that doesn’t meet the strength requirement, an email address that doesn’t validate, that sort of thing.
That’s the full update done. Visit the front end of a post you’ve written and check the byline and bio block to make sure everything is showing the way you expect.
Common Mistakes Worth Avoiding
A few things go wrong often enough to be worth calling out.
Leaving Display Name as the username. Already mentioned, worth repeating. If your byline reads as your login handle, change it.
Skipping the bio. A blank bio leaves an empty space at the foot of every article you write. Even two sentences are better than nothing.
Using the wrong email for Gravatar. If your avatar isn’t showing up after you’ve set one, check that the email on your Gravatar account matches the email on your WordPress profile. They have to be the same.
Adding dead social links. A link to a dormant profile hurts more than no link at all. Audit your social fields once a year and remove anything you no longer use.
Forgetting to log out elsewhere. If you’ve ever logged into the site from a device you no longer have access to, run Log Out Everywhere Else as a matter of course.
What to Check After You Save
Open the front end of the site and look at three things.
The first is a recent post you’ve written. Check that the byline shows your chosen display name, not your username. Check that any bio block at the foot of the post is showing the biographical info you just saved.
The second is your author archive page. Most themes have one at yourdomain.com/author/your-username. This page lists every article you’ve written, usually with your bio at the top. Check that page looks right.
The third is your avatar. It should show in the byline, in the bio block, and beside any comments you’ve made on the site. If it’s not showing, the issue is almost always a mismatch between your WordPress email and your Gravatar email.
A Note on Multi-Author Sites
If the site runs multiple authors, there are a few things worth keeping consistent across the team.
Bio length and tone. If one author has a four-paragraph bio and another has a single sentence, the site looks uneven. Agree on a rough word count. Two to four sentences is a good standard.
Avatar style. A mix of headshots, illustrations and logos looks scrappy. Pick a style and stick with it.
Social profiles shown. Decide which social platforms to display and apply them across the team. If LinkedIn is on for one author, it should be on for all.
The simplest way to manage this is a short internal style note that gets shared with new authors when their accounts are set up. It saves cleaning up inconsistencies later.
Updating your profile takes ten minutes and you’re set. Once it’s done, your byline and bio will show up correctly on every post you publish.
If you’re getting your WordPress site in order more broadly, like author profiles, content structure, and the small things that add up to a site that feels considered, that’s the kind of work we do every day.
Talk to us about your WordPress Site.